USER GUIDES
Using PostGrid's Bulk Address Verification Tool
Introduction
PostGrid’s Bulk Address Verification tool lets you verify and standardize addresses in order to ensure deliverability and eliminate duplicates. It also appends missing information and corrects invalid information where possible.
In order to use our bulk verification tool, you can sign up to our address verification platform here, where you can clean up to 100 addresses for free.
Getting Started
After you have signed up and logged into our platform, you can head over to the dashboard to access the bulk verification tool.
Prepare Your File
You can prepare your file for upload by ensuring that it has no completely empty lines and for best results, make sure to include a column with the country of the address (preferably the country code, e.g. `US` for United States, `CA` for Canada).
You can download a sample file here.

Note that you can have any number of additional columns in your data. These will be left as-is in the output.
Upload Your File
Once your file is ready, you can head over to the bulk verification tool and click on upload.
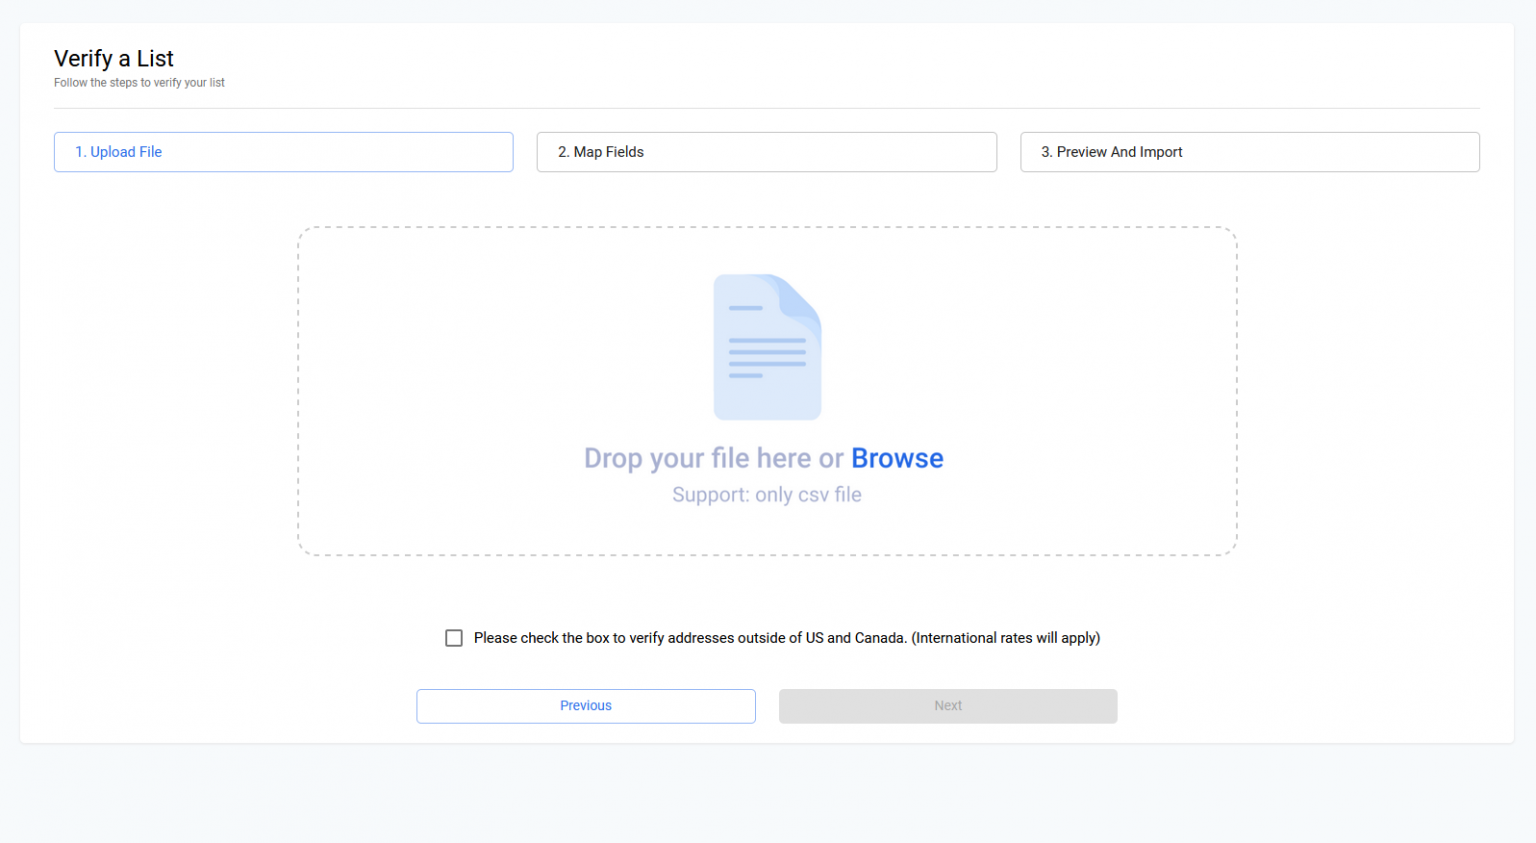
If your file contains international addresses (outside of US & Canada), then you can check the international addrss checkbox in order to ensure they are processed correctly. Note that different rates apply for international verification.
Map Columns to Fields
Once you have uploaded your file, you can click “next” to map the columns in your CSV file to fields that PostGrid understands.
In the case of the sample file, our “Address” column corresponds to “Address Line 1”, “Address 2” corresponds to “Address Line 2“, etc. This differs depending on your CSV file, but for the best results we should map as many fields as possible.

Suppose your addresses were not broken down into multiple columns. For example, rather than a Address/City/State column you just had an Address column. In that case, you would just map “Address Line 1” and leave the rest of the mappings blank. PostGrid will automatically recognize the different parts of the address in that case.
Confirm Your Upload
Once you have mapped your fields, you can click “Confirm Field Mappings” to proceed to the final step.
Here you will be presented with a summary of your file along with the total cost of processing. Note that the first 100 addresses are free, and we only charge for additional addresses on top of that. The more addresses you have, the lower the pricing. You can also contact us to discuss pricing for more than 100K addresses.
You can click “Confirm” in order to complete your upload, and your file will begin processing immediately. Depending on how many addresses you have, the processing will be completed within a few seconds to a few minutes, and you will receive an email once its completed.
If the file fails to process for any reason, you will not be charged.
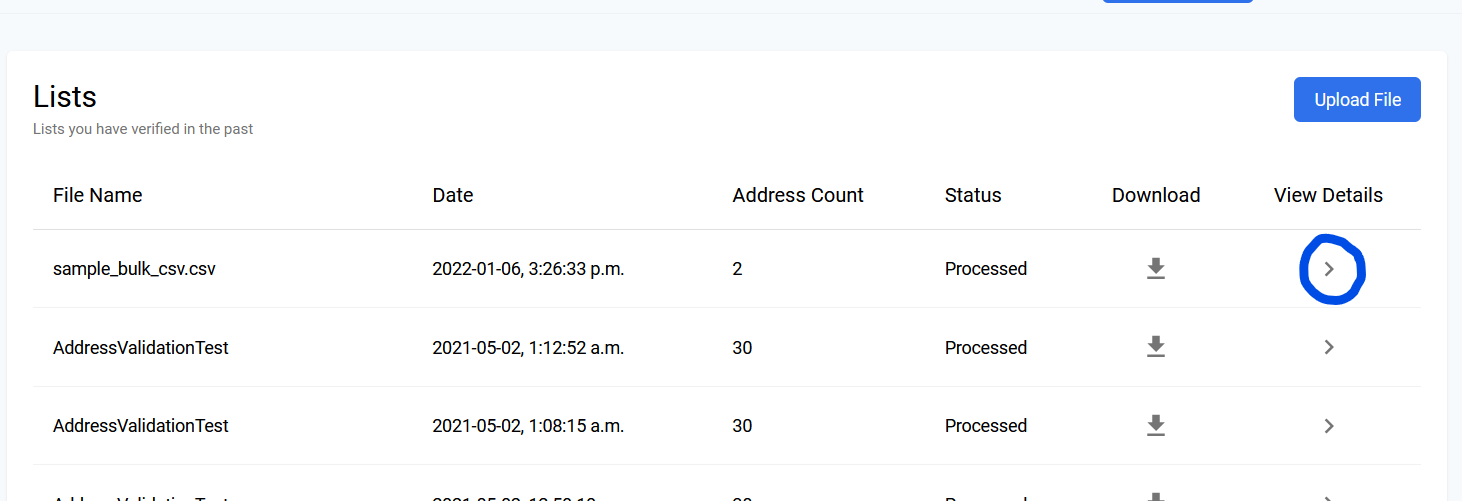
View Details
You can view a summary of the processing by clicking the “View Details” button.
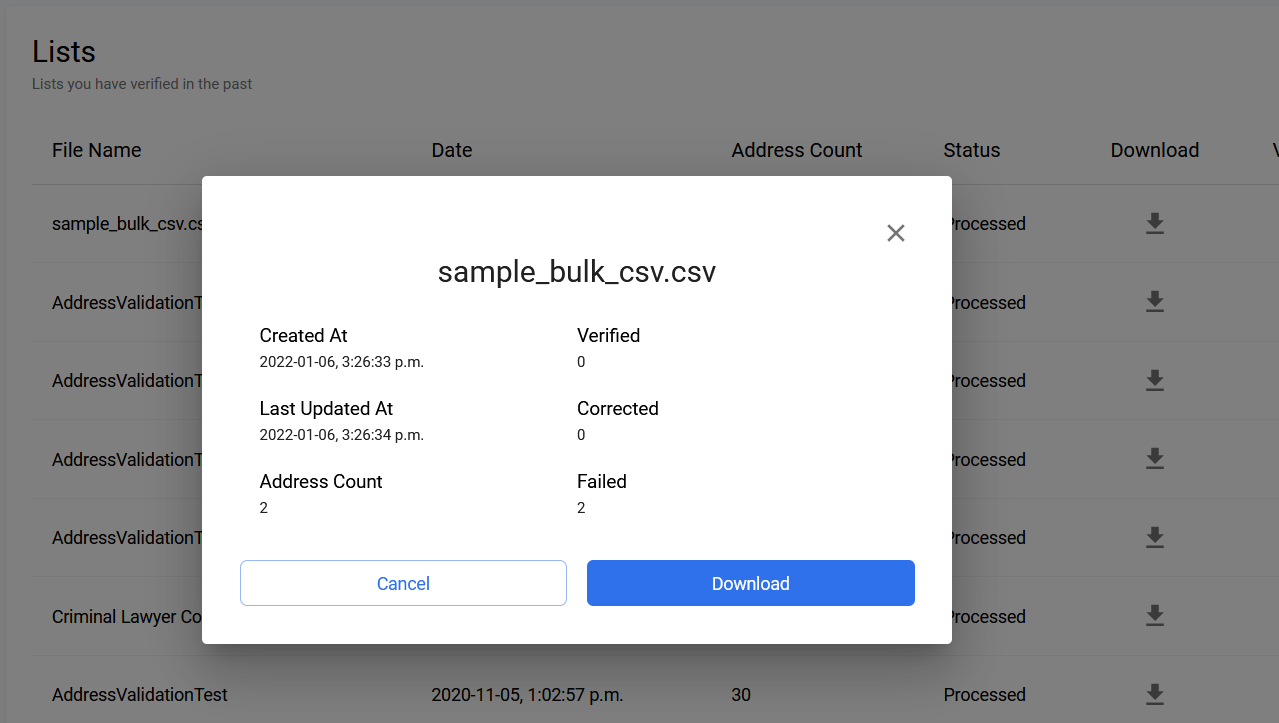
This shows a summary of how many addresses were correct as-is (verified), how many we were able to fix in order to make deliverable (corrected) and how many could not be fixed or matched to an address in any postal database (failed).
Download The Result
Once the file is processed, you can download the output file. We can see that the output file retains the columns in the input file, but updates the rows after processing the addresses.

In this case, we see that it corrected both of the addresses we provided in accordance with postal standards. We can see that by looking at the (new) `PG_STATUS` column that was added. There are also additional columns like `PG_CORRECTIONS` which provide information about what was incorrect about the original address.
Quick Start to PostGrid Autocomplete
The best way to make sure that users are giving correct address details is to implement some form of autocomplete.
In this guide, we will be walking through a quick setup for getting autocomplete going with your webpage.
Setting up our Autocomplete
In this quick start guide, we will build a functional autocomplete directly from scratch into a very a simple webpage.
You may follow the headers below to navigate the steps of this process.
Let’s start with a new HTML file `index.html`.
Into this file, let’s insert a very basic form to receive input for the main address line, the second address line, the city, the postal/ZIP code, the state/province, and the country.
Getting your API Key
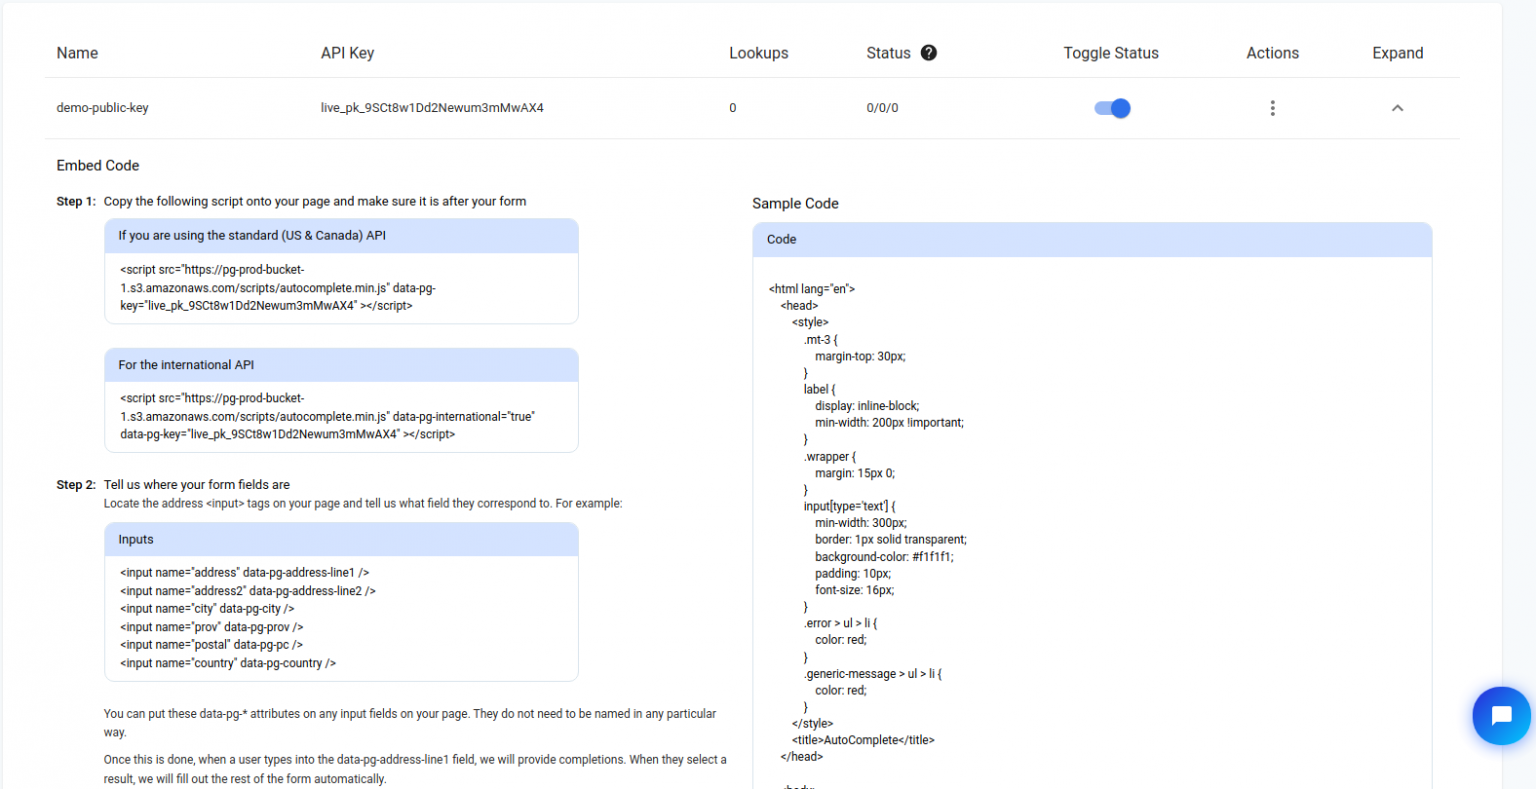
Autocomplete with PostGrid is super quick to get going with and the first thing we will need is our API key.
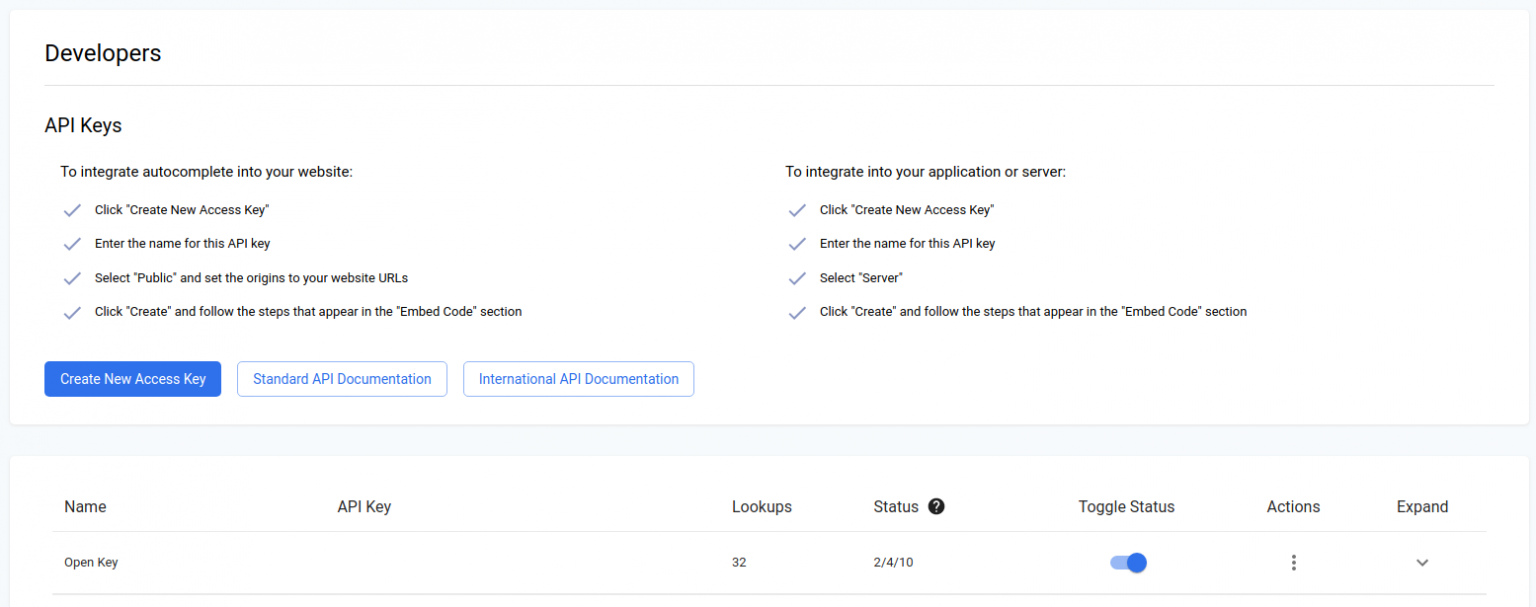
To access this, you will first want to head over to your dashboard and navigate to the developers sections.
From here, you may either grab an existing key or create a new one.

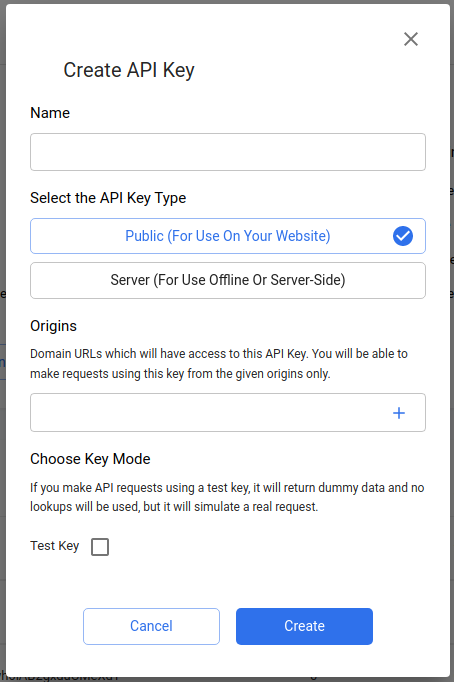
Creating a new access key, we see a few options and importantly whether or not this API key will be for public use or to be used on your own server.
With autocomplete to go directly onto your webpage, you will likely want a public key and to add any origins you may include autocomplete on.
However, since we will be testing on a local file, we will need a server key just for testing purposes.
For clarity, the only differences between a public key and a server key is really just that public keys will only work on certain origins and are prefixed by ‘live_pk’ while server key will work everywhere and are prefixed by ‘live_sk’.
Also, you may create a test key which does not consume any lookups but only returns dummy data.
Test keys will be prefixed by ‘test’ instead of ‘live’ as well.
Since we only get dummy data back, I’ll be using a live key for this quick start guide.

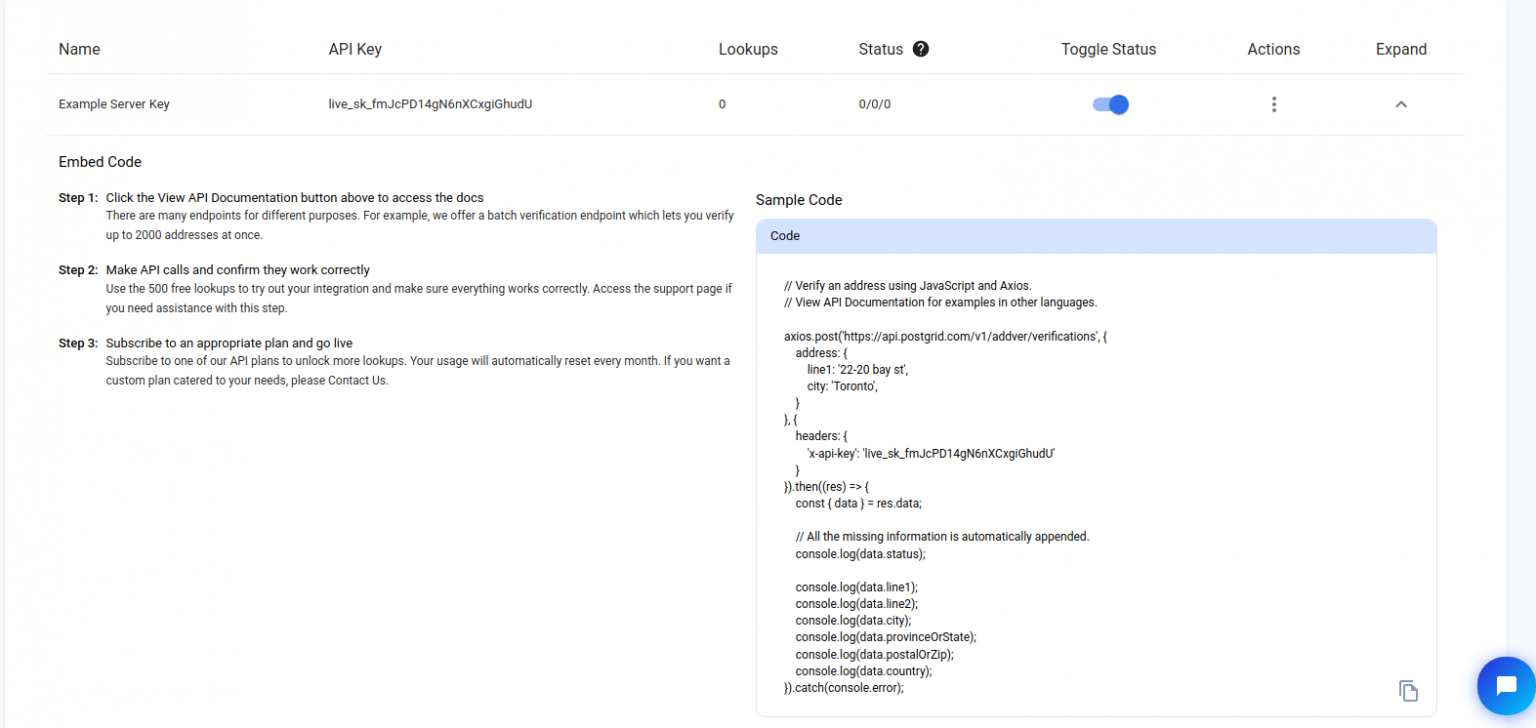
Once we have our key, we actually find a quick step-by-step for setting up our autocomplete as well as some sample code.
For this guide, we will be using the data tags and script available in these steps for how we can quickly get going with autocomplete without too much hassle.
Adding Autocomplete
From here, it isn’t too difficult to now add autocomplete.
We will start by adding to the bottom of our document the following script tag
Already, we are able to test out our autocomplete by typing in to our “Address Line 1” field.
As users type into the first line, you can find a list of addresses matching the supplied partial address.
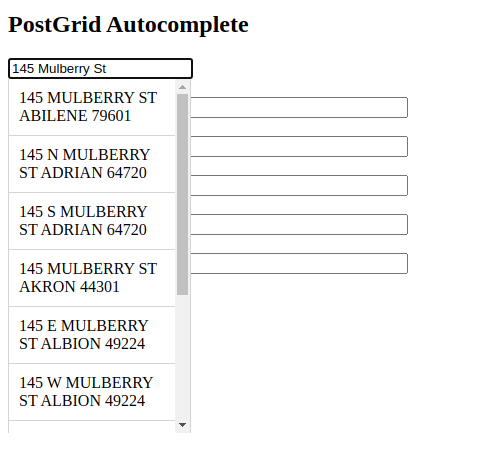
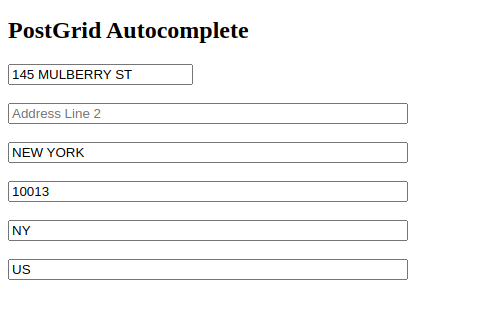
Once users select one of the addresses in the list, the other fields are automatically filled out, and it is this action which consumes a lookup and not the typing.
Verifying Before Submission
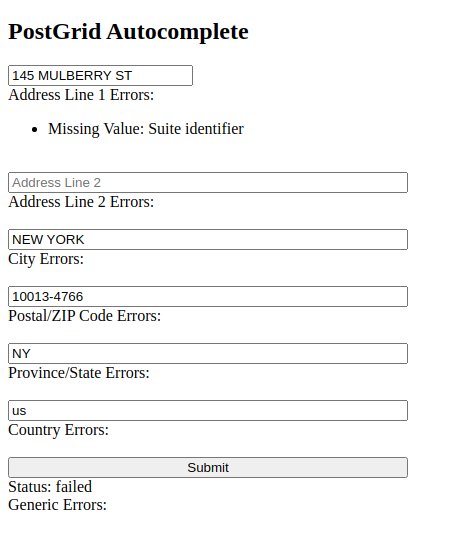
One limitation to autocomplete is often that we wish to allow users to continue to change the address after selection.
This is why PostGrid’s autocomplete if often paired up with our address verification functionality.
To enable this functionality, all we must do is add a submit button to the end of our form and the address details from the form will automatically be verified and corrected when applicable.
which would, for instance, allow us to let users know if a unit number is missing.
Country Filters and International Autocomplete
With some basic functionality going, let’s discuss how we can customize autocomplete for the best results.
The first of these customizations is which country we would like to filter by.
With the options currently in our index file, we should be receiving autocomplete information for US and Canadian addresses as part of the standard verification product.
To determine which of these countries we would like to verify between, say limiting to only Canadian addresses, we can set the `data-pg-country-filter` attribute in our script tag as follows
With access now to over 200 countries, you may set the value of `data-pg-country-filter` to any valid country code to narrow results how you would like.
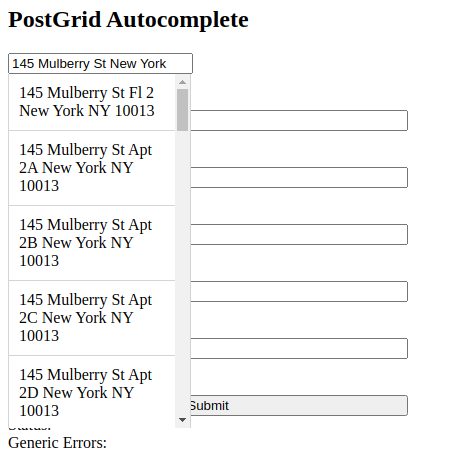
Also with our international autocomplete is enhanced unit detection, allowing users to select their unit after they have located their primary address.
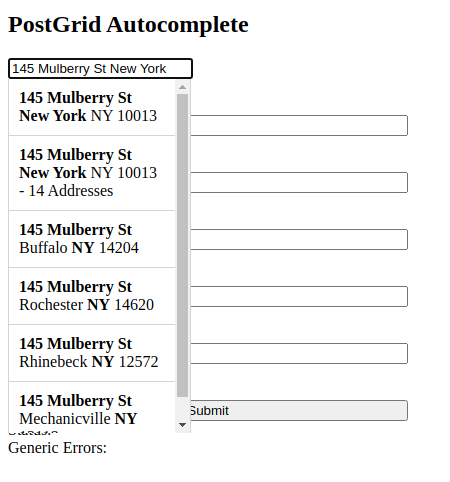
Selecting the hint for the 14 addresses at 145 Mulberry St, we obtain a full list of possible unit numbers to choose from.
Additional Options
On top of the basic filters above, there are a number of options you may set by adding certain ‘true’ or ‘false’ attributes to your script tag. The default for each is “false” if left unspecified.
data-pg-full-autocomplete
This attribute applies only to international autocomplete and enables users to see more advanced address details instead of the normal previews when selecting the address.
data-pg-full-address-line1
Set this option to true to place the entire address into line 1 upon completing an address.
data-pg-use-province-codes
This setting is for use of province codes when using the international verification product. Set this to true to ensure that provinces and states come back in initialized form (e.g. ‘QC’ for Quebec).
Callbacks
For some additional actions to be used upon users completing an address, you may also register a callback. Callback functions consume the address as a parameter, with the below being an example for completing our 145 Mulberry Address example from above.
For international verification, selecting the unit “Ph D”, we have obtain a different result.
These can be seen easily by registering a basic logging callback by adding the following script to the body of our code.
The function `registerPostGridAddressCompletedCallback` will return a callback index which can then be deregistered by providing this index to the function `unregisterPostGridAddressCompletedCallback`, much in the same way that you can use `setTimeout` and `clearTimeout` in JavaScript.
You may set as many callback functions as needed to respond to the user selected completion.
Conclusion
With this, you have enough information to get going with a simple implementation of PostGrid’s autocomplete feature.
From here, you can use the script attached to this document and the data tags in order to get going with a new webpage or attached to your own webpage.
Add styles, callback functions, and other layers you wish to use this data with for near limitless implementation possibilities.
For more details on autocomplete, and how to work directly with our API, see our full documentation here for standard autocomplete and here for international autocomplete.
Quick Start to PostGrid Address Verification
Ensuring that your users have accurate address details is a key factor to making sure that any mail or packages sent out are received at the correct address. In this guide, we will be going over a quick setup for getting PostGrid’s address verification set up and how to use it to the best effect.
Getting Your API Key
Verify with PostGrid is straightforward to get started with and the first thing we will need is our API key.
To access this, you will first want to head over to your dashboard and navigate to the developers sections.
From here, you may either grab an existing key or create a new one.
Creating a new access key, we see a few options and importantly whether or not this API key will be for public use or to be used on your own server.
In cases where you want to run validation on the front end of your web application, this is where you would be looking to use a public key which can only be used on specified origins.
Since we will be setting this up in a local environment for applications on verifying an existing database of user data, we will create a server key which can be used anywhere (and you definitely wouldn’t want that on your webpage!).
Also, you may create a test key which does not consume any lookups but only returns dummy data.
Test keys will be prefixed by ‘test’ instead of ‘live’ as well.
Since we only get dummy data back, I’ll be using a live key for this quick start guide.
Once we have our key, we find a quick a brief JavaScript example using the Axios library.
Setup
For this example, we will be working with the Node library node-fetch to make API requests just as we would in a browser.
This guide will also be generally applicable to other libraries and programming languages with generic support such as Python, though it will focus on JavScript implementation.
Let’s start by setting up a simple `index.js` file with our singular dependency, an async logging function to log results of async function, and some constants which we will be using throughout.
and run `npm install node-fetch` to add our dependency. To run our code, we will simply use `node index.js` to execute what we have set up.
Note on JSDoc
Also, as you can see from the function `logAwait`, we will be adding annotations to our code to explain what you can expect from each of the parameters being used.
For more information, be sure to have a look at JSDoc.
If you are familiar with TypeScript, these annotations can be seen as a way to add typing to a JS file without using TypeScript syntax.
These annotations will also allow us easy access to autocomplete within our code.
US and Canadian Addresses
For the first section, let’s try out verifying some addresses using our standard API.
This end point covers addresses in both the US and in Canada and comes at a different cost to our international product.
Verifying an Address
For our first verify function, let’s set up a function for verifying an address broken down into its components (line 1, city, state/province, etc.).
Following the API docs, we find that we will need to setup a `POST` request to `/verifications`, where we can use the example to fill in how our data should be structured.
Note that we may also supply the address as a string such as ‘145 Mulberry St, New York, NY 10013’.
With this function, let’s add an example and log the output by running `node index.js`. Keep in mind that providing the country code will give the best results.
which gives us back the following result:
The first detail to look at is the `status` at the bottom.
Here’s a look at the possibilities.
– `failed` – the address is undeliverable as it is and no clear corrections could be made.
– `corrected` – address matches one found in USPS or Canada Post database but needed a correction. The resulting address is deliverable.
– `verified` – address is an exact match as is and can be delivered to.
In our example, the address was undeliverable.
Fortunately, we also find an `errors` object which tells us that the only correction we will need to make is to determine which unit number is needed.
Also note how that ZIP code and the additional 4 digits were still able to be added, so if we had specified the unit number, then this address would have been marked as `corrected`.
As mentioned above, we can also supply the address as a freeform string.
Let’s try out and example with a Canadian address.
This gives the following result:
Extra Details
While the information produced by verifying an address are nice, we can upgrade our output using query parameters.
To get extra details, all we need to do is add the parameter `includeDetails=true` to our URL in our API call.
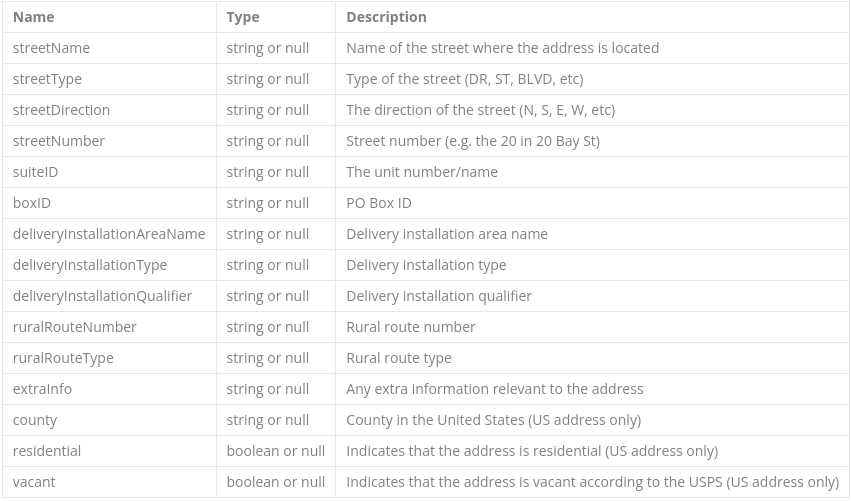
Here’s a look at the extra details that could be provided, which can be found in our API documentation.
Also, we can get our data back using proper case with the query parameter `properCase=true`.
Let’s upgrade our existing function to consume these parameters as boolean inputs.
Let’s try this out with an example, modifying our first failed address to include a unit number.
We now see the following output.
Geocoding
In addition to the above parameters, you may also supply the parameter `goecode=true` to receive geocoding data on latitude and longitude of a particular address.
Check out the goecoding section in our < href=”https://avdocs.postgrid.com/#geocoding” target=”_blank”>docs for more info.
This will also come as an additional lookup, so a total of two lookups per API call with geocoding enabled.
To get access to this feature, be sure to reach out to us at support@postgrid.com.
Verifying Batches of Addresses
In addition to validating singular addresses, PostGrid also supports verifying addresses in batches of up to 2000 at a time.
This can help verify existing databases of addresses and allow you to verify many more addresses without exceeding any rate limits.
Fortunately, we are already familiar with verifying addresses so we can make a similar function for handling batches.
Note that batches can contain a mix between structured and freeform addresses.
Note the change to the endpoint as well, since this is a `POST` request to `/verifications/batch`.
The output of this function will simply be an array of the results if we had verified them individually, preserving the order as well.
This test case gives us the following result.
International Address Verification
With a basic understanding of the API for the standard product, let’s now see how this transforms into the very similar international product.
Since the endpoints are so similar, let’s just upgrade our existing functions and try them out to see the new output.
To enable this, everything works exactly as before but you will want to use the international address URL instead.
Also, the output will be more enriched by default with a different set of details.
Using the international URL, let’s test out an address.
Running the above code in our `index.js` file now gives us the following.
One other point to note for the international product is that geocoding is now accessed by providing the query parameter `goeData=true` instead.
Conclusion
With this quick start guide, you are now ready to dig in and set up your own applications to start verifying entire databases or adding an additional layer of verification to incoming addresses.
For further questions, be sure to check our our standard API docs here and our international API docs here.
For anything else, be sure to email us at support@postgrid.com.
We integrate with the
platforms you love
Connect the email verification API to check emails in real time. If you need to clean your list in bulk, just import, validate, and then export it backto your platform.
Ready To Get Started?
Start transforming and automating your offline communications with PostGrid